
For wheelchair users, purchasing pants 'off the rack' presents many potential challenges. However, there are things you can do yourself to help create more comfort and functionality, so that the gem you found in the vintage store, or from one of your favourite brands, is better suited to your own personal dressing needs, or those of a loved one. Depending on the circumstances, these tips can either be done on your own, or you can ask someone else to do it for you.

Wheelchair users have unique pant needs that are different to individuals that are ambulatory. Sitting for long periods of time can become uncomfortable in pants that are cut for a standing frame. They will dig into your gut, feel tight around the waist, and ride down at the back.
For some, depending on the details found on the pants, such as rivets and bulky seams, they can even be dangerous. Being mindful of what you are sitting on is key for people living with disabilities involving paralysis. Pressure sores can develop; these can be difficult to heal and can be life threatening.
Finding ways to achieve comfort, function, ease of dressing, and style in a pair of pants can be a game-changer.
With that being said, here are some hacks to help you create your own adaptive pants:
How to Adapt Pants for Wheelchair Users
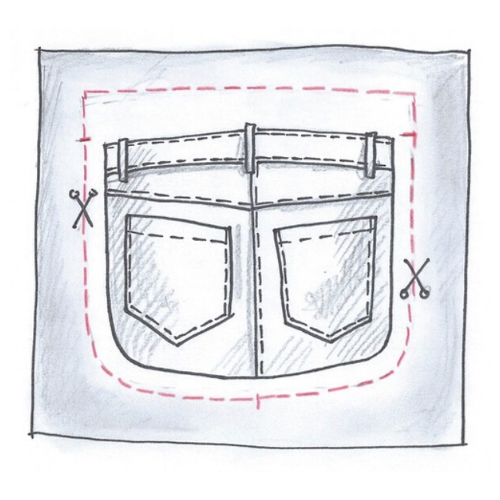
1. Remove the back pockets
If you have pants that have back pockets, it’s a good idea to remove them. The bulk of the seams at the corners, as well as rivets, can cause a pressure sore. Be mindful of what you are sitting on at all times, whether it be seam details or anything else.
2. Create an opening for a leg bag
If you are someone that uses a leg bag, and would rather not have it strapped to your calf, you can create an opening for your tubing at the side of your pants in the seam near the upper thigh. I would recommend making it 2 inches long. You can run your tubing out through that opening and place your leg bag in a tote bag hanging from the side of your chair. You can cover the tubing with a scarf, a piece of fabric, or create a cover for the tubing with fabric and velcro.
3. Add zippers to create new access points
Adding zippers to any area you need access to, such as the crotch area, helps to open the area up without having to undress. Zippers can be placed in any seam near the area you’d like to access.
4. Add a full-length zipper to the side seam
Adding full length separating zippers from the top of the waistband to the hem of the pants will allow them to fully open. This adaptation offers benefits such as easier dressing for wheelchair users, better access to needed areas, and can allow for less transfers.
5. Replace the rear side of the pants with softer fabric
This last suggestion is a bit more challenging to execute and might need to be done by someone who has experience in cutting and sewing clothing.
To ensure that the back of your pants are free of all seams, consider this next idea: replacing the back area of your pants, that you sit on, with a softer fabric.
First, you’ll need to get a ½ metre or yard of soft fabric such as fleece or sweatpant fabric. Cut out the “sitting” area at the back of your pants, including the waistband. The shape of the area to be cut out will resemble a ‘U’ shape.

Next, use the piece that you removed from the pants as a guide to cut out the softer fabric with. When cutting your fabric, make it 1” larger around the U shape edges. This will allow for a ½” seam allowance required for sewing them together.
At the waist area, you can add the height of the waistband of the pants you are adjusting, … usually about 1.25” - 1.5”. Stitch in the new fabric to the area you’ve cut out. You can then hem the waist or you can consider adding a bit of elastic inside the hem at the waist for extra flexibility and durability.
Why should wheelchair users adapt their own clothes?
Sometimes that almost perfect item is found in a thrift store, or from a store that doesn’t offer adaptive clothing, and with just a few tweaks, it becomes the perfect fit. Knowing these tricks can help you shop for more variety, offering you even more comfort and selection, and enabling you, or a loved one, to dress a little easier ... and with style.
I hope you’ve found these tips helpful. If you have any questions or comments, please share them below, and we would love to hear about some of the hacks you have used as well! We always love getting feedback to help us develop ideas for wheelchair pants that people want, so browse some of our pants for women and pants for men, and tell us what you'd like to see more of. Tweet us with the hashtag #newizproductideas.